
Figure 1 Die casting process used for casting the test material
The research paper published by IJSER journal is about EFFECT OF MAGNESIUM ENHANCEMENT ON MECHANICAL PROPERTY AND WEAR BEHAVIOUR OF LM6 ALUMINUM ALLOY 1
ISSN 2229-5518
R. S. Rana and Rajesh Purohit
Mechanical Engineering Department, Maulana Azad National Institute of Technology, Bhoapl-462051.
E-mail: ravindrarana74@gmail.com, r_purohit73@hotmail.com
Abstract: For last several decades aluminium and aluminium alloys are widely used in automotive industries because for their favourable properties like low density (about 2700 Kg/m3), good malleability, high formability, high corrosion resistance and high electrical and thermal conductivity. High machinability and workability of aluminium alloys are prone to porosity due to gases dissolved during melting processes. How ever, in the engineering application pure aluminium and its alloys still have some problems such as relatively low strength, unstable mechanical properties and low wear resistance. The microstructure can be modified and mechanical properties, wear resistance can be improved by alloying, cold working and heat treatment. In this regards, the present paper reports the influences of enhancement of magnesium contents on the mechanical properties and wear behavior of LM 6 aluminum alloy.
Index Terms: LM 6 Aluminum alloy, wear rate
Engineering and consumer goods are produced by a number of techniques among which are sand casting and die casting. Lynch et al. (1975) observed that although sand cast parts are characterised by rough surface finishes, sand casting as a process offers a cheap means of fabrication which also allows undercuts and channels to be cast into the part and allows the casting of many small-sized parts simultaneously in the same mould, thus increasing productivity The maximum weight obtainable by squeeze casting is 19kg for aluminium-base alloys (Clegg 1991; Yue
and Chadwick 1996). But the maximum weights attainable by chill casting are 70kg, 25kg, 13.6kg and 9kg for aluminium-base alloys, magnesium-base alloys, cast iron and copper-base alloys, respectively (West and Gruback
1989; Clegg 1991). Abdulkabir Raji was observed that the
grain size of the microstructures of the cast products
increased from those of Die-casting to sand casting. Conversely, the mechanical properties of the cast products improved from those of sand casting to Die-casting [3]. Each alternative technique is characterized by its own distinct capabilities and related costs.. we have investigated the effect of enhancementment of magnisum addition in LM6 alloy on hardness and wear resistance and compare these properties with LM6 alloy. Results revealed that hardness and wear resistance of new LM6 alloy increases with high Mg addition.
1.18% and the effect of this enhancement on tensile
strength, hardness and wear properties of LM6 alloy was studied. Aluminum alloy (LM6) & Mg was supplied by S. M. Founders (Bhopal). The oil fired furnace was used for casting the LM6 alloy.
Table-1CHEMICAL COMPOSITION OF LM6
IJSER © 2012 http://www.ijser.org
The research paper published by IJSER journal is about EFFECT OF MAGNESIUM ENHANCEMENT ON MECHANICAL PROPERTY AND WEAR BEHAVIOUR OF LM6 ALUMINUM ALLOY 2
ISSN 2229-5518
Iron | 0.6 max |
Manganese | 0.5 max |
Nickel | 0.1 max |
Zinc | 0.1 max. |
Lead | 0.1 max. |
Tin | 0.05 max |
Titanium | 0.2 max |
Aluminium | Remainder |
Others: each | 0.05 max. |
Table2 Mechanical properties of die cast lm 6 alloy
Tensile Stress 2 (N/mm ) | Elongation (%) | Brinell Hardness | Endurance Limit 7 (5x10 cycles; 2 N/mm ) | Modulus of Elasticity 3 (x10 2 N/mm ) |
280 | 2-5 | 55-60 | 70-100 | 71 |
Table 3 Composition of aluminum alloy used in the present work
Sr. No. | Material | % Wt. |
1. | Al | 88.48 |
2. | Cu | 0.06 |
3. | Mg | 1.18 |
4. | Si | 9.52 |
5. | Fe | 0.425 |
6. | Ni | 0.005 |
7. | Mn | 0.048 |
8. | Zn | 0.044 |
9. | Sn | 0.006 |
10 | Ti | 0.043 |
11. | Cr | 0.170 |
12. | V | 0.019 |
7000C to 750oC. The consumption rate of the oil in the furnace was 13-20 liters /hour. Molten metal was poured in mild steel die which is preheated to about 200oC. No
external source of cooling the die was used. The cooling was done by the natural convection & conduction process. The die casting process was used to cast the specimen
because this process is best suited for speedy production of bulk metallic parts, and it requires minimal secondary operations like machining. Figure 1 shows the Die casting process used for casting the test specimens. Others equipments used in the present work include wear analysis apparatus, Precision electron balance, Brinell hardness testing machine and Universal testing machine for further investigation of cast product.

Figure 1 Die casting process used for casting the test material
4. Testing of Properties: The mechanical properties like tensile strength, Hardness and tribological properties like wear resistance were investigated in the present work.
57 mm, Grip section = 50 mm, Width of grip section = 20 mm, Gauge diameter = (a) 13 mm, (b) 12.3 mm.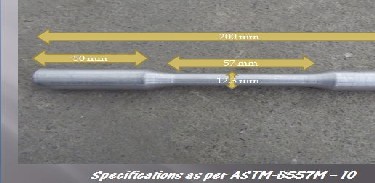
Figure 2 Dimensions of tensile specimen
Tensile test were performed on UTM of the specimen having gauge diameter 13 mm and 12.3 mm. The test results were summarized in the table 4 and table 5 for the
IJSER © 2012 http://www.ijser.org
The research paper published by IJSER journal is about EFFECT OF MAGNESIUM ENHANCEMENT ON MECHANICAL PROPERTY AND WEAR BEHAVIOUR OF LM6 ALUMINUM ALLOY 3
ISSN 2229-5518
diameter of the specimen 13 mm and 12.6 mm respectively. Stress vs strain curve were shown in the Figure 3. The value
of Young’s Modulus was found to be 3.036 GPa on the basis
of this stress and strain curve.
Table4 Results of the tensile test for gauge diameter of 13 mm
ULTIMATE BREAKING LOAD | 28.880KN |
MAXIMUM DISPLACEMENT | 6.810 mm |
ULTIMATE STRESS | 0.217 kN/mm 2 |
ELONGATION | 7.692 % |
REDUCTION IN AREA | 14.793 % |
YIELD STRESS | 0.187 kN/mm 2 |
YS / UTS RATIO | 0.861 |
Table 5 Results of the tensile test for gauge diameter of 12.3 mm
ULTIMATE BREAKING LOAD | 25.720KN |
MAXIMUM DISPLACEMENT | 5.280 mm |
ULTIMATE STRESS | 2 0.216 kN/mm |
ELONGATION | 12.821 % |
REDUCTION IN AREA | 4.819 % |
YIELD STRESS | 0.187 kN/mm 2 |
YS / UTS RATIO | 0.861 |
![]()
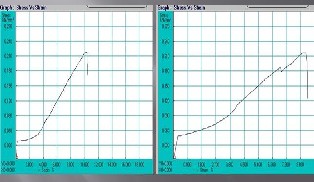
For d = 13 mm For d = 12.3 mm
Figure 3 Stress vs strain curve obtained during tensile test
Thus, brittleness of the material has increased tremendously. In brittle fracture, no apparent plastic
deformation takes place before fracture. In brittle crystalline materials, fracture can occur by cleavage as the result of tensile stress acting normal to crystallographic planes with low bonding (cleavage planes). In amorphous solids, by contrast, the lack of a crystalline structure results in a conchoidal fracture, with cracks proceeding normal to the applied tensile load.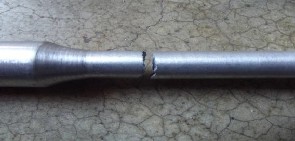
Figure 4 Photograph of the fractured tensile test specimen
20N, 30N and 40N applied load. Weight of the specimen
was measured before and after each reading. Dimensions of
test specimen for wear test are as follows (Figure 5): Diameter of specimen = 10 mm
Length of specimen = 30 mm.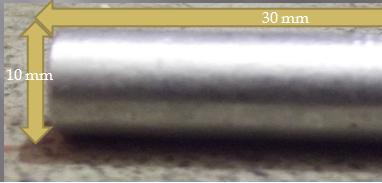
Figure 5 Photograph of the wear test sample
The following formula was used to to calculate the Wear Rate which is equal to the Volume removed/unit distance of sliding/unit loading:
Wear Rate = (dW)/(πρDPNt) Here, dW = weight lost after test,
ρ = density of material = 2.65617 g/cm3
IJSER © 2012 http://www.ijser.org
The research paper published by IJSER journal is about EFFECT OF MAGNESIUM ENHANCEMENT ON MECHANICAL PROPERTY AND WEAR BEHAVIOUR OF LM6 ALUMINUM ALLOY 4
ISSN 2229-5518
D = track radius,
N = average rotating disc speed,
t = time duration of test, P = applied load,
Table 7. The average hardness of test material was found to be 98.25 BHN.
Table 7 Results of the hardness tests
On the basis of test results shown in Table 6, the aveSrra.ge Value
wear rate was found to be 1.2762 x 10⁻¹³ m3/Nm. ForNlo.ad of
=30 N the trends of wear, frictional force and coefficient of (P/D2)
Load P (kgf)
Diameter of indenter
Time for which load was
Diameter of indentati
BHN
friction with respect to time is shown in figure 6. | (mm) | applied (Seconds) | on mark (mm) | ||||
Table 6 Results of the wear test | 1. | 30 | 3000 | 10 | 30 | 6.2 | 88.66 |
2. | 30 | 3000 | 10 | 15 | 6.0 | 95.49 | |
3. | 30 | 1500 | 10 | 30 | 4.1 | 108.62 | |
4. | 30 | 500 | 10 | 180 | 2.5 | 100.24 |
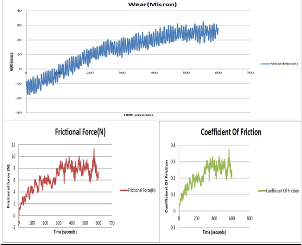
Figure 6 The graph of the wear rate, friction force and coefficient of friction obtained during wear test
(a)Tensile test was performed on specimens with diameter 13 mm and 12.3 mm, in which we got mean Ultimate Tensile Strength =
217 N/mm2, mean Yield Strength = 187 N/mm2 and Young’s
Modulus = 3.036 GPa. Ultimate Tensile strength has decreased with
Mg addition.
(b)Wear test was done on the specimen of diameter 10 mm in which we got mean Wear rate = 1.2762 x 10⁻¹³ m3/Nm .Wear rate has decreased with Mg addition.
(c)Brinell hardness test was done and the mean BHN 98.25. Hardness has increased with Mg addition.
(d)The comparison of Mechanical properties and wear behaviour of LM6 and LM6alloy with higher Magnesium contents was done and is shown in Table 8.
Table8
1500 kgf, 500kgf for a given time period and indenter diameter was 10 mm. the test result were shown in the
IJSER © 2012 http://www.ijser.org
The research paper published by IJSER journal is about EFFECT OF MAGNESIUM ENHANCEMENT ON MECHANICAL PROPERTY AND WEAR BEHAVIOUR OF LM6 ALUMINUM ALLOY 5
ISSN 2229-5518
From experiment al study on the LM6 alloy, hardness was found to increase with increase in Mg content
while the yield strength and ductility was found to decrease with increase in Mg content due to brittleness of the material. Wear rate was also found to decrease with increase in Mg content. This is due to softening of the material at the warm surfaces due to higher temperature at the contact surface.
[1]. Das S., Mondal D.P., Sawla S., Ramkrishnan N., Synergic effect of reinforcement and heat treatment on the two body abrasive wear of an Al–Si alloy under varying loads and abrasive sizes, Wear, Vol. 264 (2008), pp. 47–59.
[2]. D. Apelian, Worldwide Report Aluminum Cast Alloys: Enabling
Tools for Improved Performance, NADCA 2009
[3]. Abdulkabir Raji, A Comparative Analysis of Grain Size and
Mechanical Properties of Al-Si Alloy Components Produced by
Different Casting Methods, AU J.T. 13(3) (Jan. 2010) pp. 158-164.
First Author :R. S. Rana , Assistant Professor Department Of
Mechanical Engineering MANIT Bhopal(India), E-mail: ravindrarana74@gmail.com,
Second Author :Rajesh Purohit Associate Professor Department Of
Mechanical Engineering MANIT Bhopal(India). E Mail :r_purohit73@hotmail.com
IJSER © 2012 http://www.ijser.org